Pages

Showing posts with label Cooking. Show all posts

Tuesday, February 21, 2012

Crock Pot Broccoli Cheese Soup

Nothing says Happy Valentine's Day like a brand new Crock Pot, right?

Well that's what I asked for this year for Valentine's Day. Our other crock pot we got for our wedding in 2000. It still works, but it has 2 sections. One larger and one smaller section - which is great if you are cooking two different things at once. But it makes it hard making larger dishes. We tried this bad boy out last week and I love it.

We tried a recipe I found through Pinterest on 365 Days of Slow Cooking. My hubby loves Broccoli Cheese Soup so I figured I'd try this recipe out. Here are the details...

INGREDIENTS:
  • 2 lbs red potatoes, peeled and cut in to 1/2 inch cubes.
  • 3/4 cup grated carrots
  • 3T dehydrated onions or 1/2 cup finely chopped fresh onions
  • 3 cups of chicken stock or chicken bouillon
  • 1/2 tsp salt
  • 1 cup warmed whole milk
  • 1/4 tsp black pepper
  • 2 cups shredded medium or sharp cheddar cheese
  • 1/2 cup freeze-dried broccoli
DIRECTIONS:
Place potatoes, carrots, onions, bouillon, and salt in slow cooker. Cover and cook on LOW for 6 hours. Stir in warmed milk, pepper, broccoli, and cheese. Cover and cook on HIGH for an additional 15 minutes or until cheese is melted and broccoli is soft.


OUR OPINIONS/COMMENTS:
ME: I ended up using frozen broccoli since I didn't have any dehydrated broccoli. Cooking time remained the same - but I added a full cup of frozen broccoli and it seemed to be the perfect amount. I liked the recipe - it was quite good. HOWEVER...The cheese makes the soup taste a bit oily. I would probably cook this again with 1/2 the cheese this recipe calls for.
ROB: Rob liked it...but he also tasted the oiliness from the cheese.
B: he ate the potatoes and the broccoli out of it - but not the soup part. He thought it was OK. But then again, he's not much of a soup person. He did say he prefers my potato soup over this recipe.

Monday, January 30, 2012

Banana Ice Cream

I'm not sure why I named this Banana Ice Cream. When I think of the words "banana ice cream" I think of my step dad making my brother and I mini banana splits. My brother used to call those "banana ice cream" when he was younger. But I just don't know what else to name this.

This is another recipe I found on Pinterest. The recipe came from THIS website. Now, the below photo is the photo that is in the pin I found on Pinterest.

(Photo credit.)
Does that not look like a yummy, delicious Frosty from Wendy's? When I saw this - I thought "YUMM-O! I must try this"

The recipe calls for 1 frozen banana and 2 tbsp of cocoa powder. BINGO - I have both of those! You blend it up and are supposed to come up with the above photo.

WARNING: For the faint at heart. This is by far the WORST photographic journaling AND nastiest photos I think I've ever taken. But I must document both my wins and my failures :)

Below: The banana (frozen) and 2 tbsp of cocoa powder in the blender.


Let me give this small word of advice: If you do choose to try this recipe out. I suggest you cut the banana up BEFORE you freeze it. Trying to blend a frozen banana + the cocoa powder isn't the easiest thing.

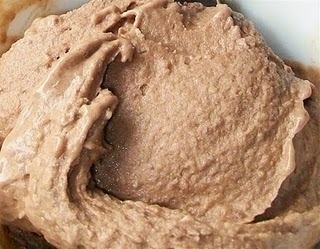
Below: towards the end of my blending attempt. Looking a little better (??). {Honestly, it looks gross!}


Below: The end product. Not quite the same as the first picture in the post. The photo that lured me in to making this.


Our opinions:
Rob: Really liked it. But then again he REALLY loves bananas.
Brad: It's ok. "Very banana-y"
Me: eh. I wouldn't make it again. A little too banana-y (as Brad puts it). I think the "look" of it from the photo on Pinterest made me think it was one thing when it was quite the other. But if you love bananas and chocolate...this is a healthy dessert alternative for you!!

Saturday, January 21, 2012

Creamy Mexican Crockpot Chicken

This week I experimented on another recipe I found on Pinterest. My friend Jen, had also made this and thought it was good so I felt pretty confident about making another mystery chicken dinner for my fam.

The recipe comes from The Larson Lingo blog. Yet another recipe I was drawn to because of the simplicity of it!

INGREDIENTS:
- Bag of frozen Chicken Breast Tenderloins (2.5-3lb bag)
- 8 oz block of cream cheese (don't use Fat Free! 1/3 less fat or regular is fine)
- Can of Black Beans, drained & rinsed. (or Pinto Beans if you prefer)
- Can of Corn, drained.
- Can of Rotel

DIRECTIONS:
  1. Put frozen chicken in the crock pot.
  2. Put Cream cheese on top of the chicken.
  3. Dump in the Black Beans (make sure they are drained & rinsed!!!)
  4. Dump in the drained corn.
  5. Dump in the Rotel
  6. Cover & cook in your Crock Pot on low for 6-8 hours.
  7. Every 2 hours, I stir the ingredients.
  8. You can shred the chicken when it is done, or just leave it as tenderloins. ( I shredded it)

If you let it sit in the crockpot for about 45 min or so after turning the crock pot off, it will become less soupy. You can serve it over rice, make tostadas, etc. Be creative!

Brad's reaction: N/A - He's getting over a "virus" and is on a bland diet.
Rob's reaction: Loved it!
My reaction: Not sure. I had to take a few deviations from the original recipe due to poor shopping on my part. (I normally don't keep canned veggies in the house, and picked up cream corn instead of corn kernals.) But I'm willing to give it another shot with the RIGHT ingredients.

No Photos on this recipe...but check out The Larson Lingo blog for great step by step photos!

Thursday, January 19, 2012

Calzone Rolls

While recovering from my knee surgery I became addicted to the Food Network. So now, if I'm stuck at home sick...or watching my little guy while he's sick...we turn to the Food Network for our daytime TV fix. While watching Rachael Ray, I came across a recipe that looked simple and yummy...my two favorite descriptions when it comes to cooking! I found it on her website...and pinned it for future use! {Pinterest...where were you all my life?}

Calzone Rolls

INGREDIENTS:
  • 4 large, crusty Kaiser rolls
  • 1 1/2 cups ricotta cheese
  • Salt and pepper
  • 1/4 pound salami, chopped
  • 1/4 cup Parmigiano Reggiano cheese
  • 8 slices fresh mozzarella
  • 8 slices vine-ripe tomatos
  • 8 fresh basil leaves, torn or sliced  (I didn't have any on hand...so I put some dried basil in the Ricotta Cheese mix)
PREPARATION:
Heat the oven to 325°F.
Split the Kaiser rolls favoring the bottom half a little. Scoop a little of the white soft insides out of the bottoms.
Season the ricotta with a little salt and pepper. Stir the salami and grated cheese into ricotta. Fill the rolls with the ricotta and salami. Cover the ricotta with mozzarella, tomato and basil. Set covers in place and bake to heat through 10-12 minutes. Cut in half and serve.

Kaiser Rolls - Cut in Half


Ricotta Cheese & Salami Mix added to Kaiser Rolls

Add Mozzarella & Tomato
Bun Tops go back on and everything in the oven!
10-12 minutes later - DING! They're ready!
All done! Cut in half and enjoy!


Rob's reaction: Like it - but needs more meat. (What else would a guy say?)
Brad's reaction: Like it - but without the tomato. (What else would a kid say?)
My reaction: Love it (especially warmed up the next day as left overs). Would recommend possibly removing the top of the roll for a bit while in the oven so the goodies inside are warmed up a bit more. Will definitely use this recipe again!


{Recipe Credit: Rachael Ray. Photo Credit: Stephanie Wadas}

Friday, January 6, 2012

Baked Turkey Sandwiches

Another Pinterest recipe....I'm on a roll. Especially with the easy-peasy recipes!

The recipe is originally from a blog post from Simple Organized Living. We tried this recipe out on Wednesday night. Everyone seemed to like it (though Brad admitted doesn't like mustard anything too much). It makes about 12 sandwiches and was super quick in terms of preparation time.

I was a bit disappointed that I was not able to find the brown & serve rolls at my grocery store - I think that would have made the recipe so much better! I also didn't use the poppy seeds. Instead, I added fresh, ground pepper. Still came out yummy :)

The Recipe for 1 Dozen Sandwiches:

Sandwiches:
  • 1 dozen Brown n’ Serve rolls
  • 1/2 to 3/4 lb. sliced deli meat
  • sliced cheese — enough to fit on each bun
Sauce: 
  • 1/2 c. butter
  • 2 T. brown sugar
  • 1 T. mustard
  • 1 T. Worcestershire sauce
  • 1 T. Poppy seeds
Directions:
  • Put sandwiches together and place in a 9×13” pan
  • Boil sauce until bubbly and pour over sandwhiches.
  • You can either bake immediately or let sit for several hours or even over night.
  • Bake in a 350*F preheated oven for 20-30 minutes, or until the tops are brown and crispy.
Leftover sandwiches are perfect for lunch the next day and taste great cold or warmed up again.

Stop by Simple Organized Life for more great recipes and information. Or check out her recipe for the sandwiches HERE - she has much better photos than I do!

Thursday, January 5, 2012

Black Eyed Pea Dip

In the South, it is tradition to have Black Eyed Peas on New Years Day. Before my mom and I moved to CA when I was in elementary school, I can remember heading over to my aunt and uncles houses to have a bowl of Black Eyed Peas to bring good luck in the new year. As an adult, I've started getting back in to that tradition over the last several years.

In all honesty, BEP's can be a bit of a pain to cook. I sometimes have the attention span of a 10 year old when I cook, so easy recipes are my fav!

While on Pinterest, I found a recipe from the Pioneer Woman (courtesy of the High Heeled Hostess) for a Black Eyed Pea dip (Zannie's Black-Eyed Pea Dip) that cut a few corners to make it an easy recipe that I wouldn't have to spend all day in the kitchen with. Here's the Recipe:

Ingredients
  • 1 can (14-ounce) Can Black-eyed Peas
  • 1/4 whole Onion, Chopped Fine
  • 1/4 cup Sour Cream
  • 8 slices Jarred Jalapenos
  • 1 cup Grated Sharp Cheddar Cheese
  • 3 Tablespoons Salsa
  • Hot Sauce, to taste
  • Salt And Black Pepper To Taste

Preparation Instructions
  1. Preheat oven to 350 degrees. Drain black-eyed peas and partially mash, leaving some whole.
  2. Add all other ingredients, stirring to combine.
  3. Spread into a 1.5 quart baking dish and bake for 20 to 30 minutes until hot and bubbly.
  4. Serve with tortilla chips
  5. Note: if you have them available, you can use the canned black-eyed peas and jalapenos. (They come canned together sometimes) If you do this, you can omit the extra jalapeƱos.


My version of the Black Eyed Pea Dip (not the best photo)
The recipe turned out quite yummy. The dip was gone pretty quick and I definitely plan to make it again!

For step by step instructions, including the beautiful photos of the Pioneer Woman, click here:

Friday, October 28, 2011

Vegetarian Black Bean Chili

Here's another one of my favorite chili recipes. This one is vegetarian and has quite a spicy kick. It can also be a great addition to a Mexican Food themed meal.

INGREDIENTS
  • 1/4 cup olive oil
  • 2 cups chopped onions
  • 1 2/3 cups coarsely chopped red bell peppers (about 2 medium)
  • 6 garlic cloves, chopped
  • 2 tablespoons chili powder
  • 2 teaspoons dried oregano
  • 1 1/2 teaspoons ground cumin
  • 1/2 teaspoon cayenne pepper
  • 3 15-16 ounce cans of black beans, drained, 1/2 cup liquid reserved (or the equivalent of home made cooked black beans)
  • 1 16 ounce can tomato sauce
Optional for Toppings
  • Chopped fresh cilantro
  • sour cream
  • grated Monterrey Jack cheese
  • Chopped Green Onion
PREPARATION
Heat oil in heavy large pot over medium-high heat. Add onions, bell peppers and garlic; saute until onions soften (about 10 minutes). Mix in chili powder, oregano, cumin and cayenne; stir 2 minutes. Mix in beans, 1/2 cup reserved bean liquid, and tomato sauce. Bring chili to boil, stirring occasionally. Reduce heat to medium-low heat and simmer until flavors blend and chili thickens, stirring occasionally, about 15 minutes. Season to taste with salt and pepper.

Ladle chili in to bowls and enjoy!

Yield: Makes 4 main-course servings.

Tuesday, October 11, 2011

Traditional Chili

Fall is here (well kind of) and I love making different kinds of chili during the cooler months. This is a traditional chili recipe that is super easy to make.

INGREDIENTS:
  • 1 - 1.5 lbs fresh ground beef (or turkey)
  • Red Pepper
  • 1 quart tomato juice
  • 1 (29 oz) can tomato puree
  • 1 (15 oz) can red beans, drained
  • 1 medium onion (1.5 cups), chopped
  • 1/2 cup celery, diced
  • 1/2 cup green pepper, diced
  • 1/4 cup chili powder
  • 1 teaspoon cumin (if you want more flavor, add a little more)
  • 1.5 teaspoons garlic powder
  • 1 teaspoon salt
  • 1/2 teaspoon oregano
  • 1/2 teaspoon black pepper
  • 1/2 teaspoon sugar
  • 1/8 teaspoon cayenne pepper
Everything's in the pot!

PREPARATION:
Brown beef in a pan adding a little red pepper while the beef is browning. You can add the onions at this point, or you can add them later (when adding all the ingredients to the pot). Drain the cooked meat. Put the drained beef and remaining ingredients in to a 6-quart pot. Cover the pot, let it simmer for 1-1.5 hours, stirring every 15 minutes or so.

All done!
Garnish with cheese, (more) chopped onions, sour cream...or make yourself a little frito pie :)

quick little frito pie

Saturday, September 24, 2011

Pumpkin Muffins

Have you been on Pinterest? Well I think the 3-4 people that read this blog are as addicted to the site as I am...so I guess the answer to that is YES.

I'm determined to not sit on my bum and just pin away...but actually take action on some of these ideas. My friend Kelly recently made a headboard that turned out beautifully. I don't know if I'm at that point of motivation yet...but I'm getting there.

I decided to start off with something super simple...Pumpkin Muffins. I found a recipe that claims that you only need 2 ingredients, mix, and pop in the oven. Bake in the oven at 350 degrees for 20-25 minutes. I had to try it to believe it!

The recipe originally comes from a blog called Sweet Verbena. Basically, you take a box of cake mix, pureed pumpkin....mix, and bake.

Cake batter + pumpkin puree

Mixed ingredients

I do have to admit that the prep was very easy. The directions mentioned you don't need anything else to make it in to a smooth batter - and they were correct. The ingredients mix really well.

Muffins - before the oven
So I have to admit I was a little under prepared. I didn't have muffin/cupcake liners. So I thought...Starbucks uses parchment paper as the liner and it looks cool...why can't I? Yeah. that wasn't so easy and made it a little messy. But it worked.

Muffins - cooked
Muffins with powdered sugar on top
I was lazy at the end...I was tired and just wanted to wrap this up as I had been cooking several things throughout the day. So I plopped (vs sprinkled) powdered sugar on top and tried one out.

I will make these again - the recipe was quite easy. However, I do think this recipe needs a little bit more spice. Definitely an easy thing to make and my son loved them...so that's a giant bonus. Especially since I cooked them for him.

Wednesday, June 1, 2011

What's Cooking: Cheese Scones

For my granny's memorial service reception, my mom and I made Cheese Scones to add to the menu for the light lunch following the service. This recipe was originally used by my cousin for her sister's bridal shower I hosted over a year ago.

I suggest you make one batch exactly as the recipe lists. From there you can tweak the recipe as you like adding different spices you feel would add to the taste of the scones.


Cheese Scones (from www.cooks.com)

INGREDIENTS
  • 1 tsp baking powder
  • 1 tsp baking soda
  • 1/2 tsp dried thyme
  • 1/4 tsp salt
  • 2 cups all purpose flour
  • 6 tbsp butter (3/4 stick)
  • 1/2 lb grated sharp cheddar cheese
  • 2 large eggs
  • 1/2 cup buttermilk
DIRECTIONS

In a mixing bowl mix first 4 ingredients with 2 cups flour.
Cut up butter and crumb into flour. Stir in cheese. Beat eggs and 1/2 cup buttermilk and add to flour mixture. Stir until just blended. Turn on to floured board, cut as desired.

If wished, brush with buttermilk or egg. Bake on ungreased cookie sheet in preheated 400 degrees for approximately 10 minutes. The secret of good scones is to work quickly after adding liquid to baking soda. Do not over knead as this makes them tough. Do not over bake as this dries them out.

Remove from cookie sheet promptly and cool on wire rack.

Enjoy!

Sunday, May 1, 2011

Cheerios Blogger Circle: Breakfast of Choice

As a member of the Cheerios Blogger Circle, I was given several topics to write about this month. One stood out and I thought ... What a great interview topic! Children are so fun to interview or question because their answers can be so honest and so far out there!

So for this exclusive interview, I’d like to introduce Bradley an eight year old, third grader and also my son!

These answers are straight from his mouth…some are the answers I actually hoped (such as his preference for healthier food). His other answers, well, you can see they are straight out of the mouth of an eight year old boy!

Question:  If you could choose anything to eat for breakfast, what would you choose?
Answer: Cheerios or Donuts

Well at least he has one healthy option as an answer! Original Cheerios has been a staple in our house for breakfast food for years. Occasionally, we treat Brad to Honey Nut Cheerios…but Original Cheerios is his typical breakfast.

Question:  When did you start eating Original Cheerios?
Answer: When I was 2 years old probably.

Actually he’s been eating them since just over 1 year old as a finger food. But he’s pretty close!!

Question:  Why do you like them?
Answer: Because they have a good taste and it has magic in it.

Magic? Cute answer! In hindsight, I should have probed the magic answer a little further.

Question:  Do you like to put anything in your Cheerios?
Answer: Yes. I like to put milk in my cereal. I also like to put dried cranberries in my cereal. My grammy (my mom’s mom) got me started on liking dried cranberries on my Cheerios when I would spend the night at her house.

I’m actually fairly impressed he remembered who introduced him to adding dried cranberries to his cereal. AND he called them by the proper name. Until only recently he was referring to them as red raisins.

Question:  Does anyone else in your family eat Cheerios?
Answer: Well I don’t know what my mom eats because she eats breakfast after I leave for school. But I eat it and sometimes my cat, Cleo, will sneak up on the table and drink the milk out of my bowl…but that’s only if my parents aren’t there.

Good to know! Maybe I need to keep a better eye on little Cleo during the breakfast time rush. Wonder what else Brad lets Cleo do without my knowledge?

Question: Why do you think mommy and daddy want you to eat Cheerios?
Answer: Because it is healthy for me at lowers my cholesterol.

When Brad answered this question…my husband and I giggled for a while. Cholesterol? Luckily he won’t have to worry about that for a while. But it’s good to know he understands we want him eating healthier food and him liking and asking for this food is an even bigger plus!

Question:  What do you think Cheerios are made out of?
Answer: Nuts and magic…it makes them delicious

OK…maybe not entirely (or any part) correct. He thinks many things are made of nuts that actually aren’t. Maybe it’s the crunch? Or maybe it’s the magic?

Question: What do you think the reason is why so many children love Cheerios?
Answer: Because some other cereals have lots and lots of sugar and not a lot of fiber. Cheerios has a lot of other healthy stuff too.

If only all children wanted the healthier option with less sugar, right?

What breakfast option does your child ask for?

-----------------------------------------------------------------------
Visit Cheerios Facebook Page or the Explore with Cheerios webpage were you can read one of my previous posts on adding a fun twist to Cheerios with Fruit Salad.

Tuesday, April 19, 2011

What's Cooking: Cake Pops

Brad has been obsessed with Starbucks cake pops. They're like $1.50 a peice so I figured...why can't I make these. They look easy enough ... even for ME! So armed with my trusty Google search engine I found this fabulous step-by-step recipe for making Cake Pops!

The first day I did everything up to the cooling of the balls. (I'm sorry, but I giggle when I say/type that). The second day I stuck the balls and dipped them. Here is my journey captured in photos...

The ingredients
So here's what I started off with. Pretty cheap considering what I spend at Starbucks for a single cake pop. I figured at this point I could get at least 20-30 cake pops out of this.


the cake
  So I baked the cake according to the directions. I decided do to the white cake with sprinkles inside for Easter...thinking it would be fun for the cake pops. I'm not much of a cake person...let alone the box cake. But we were going for simplicity here - and box cake mixes are just that. SIMPLE.


cake crumbs
 Seems counter-intuitive...but the next step was to break down the cake you just baked in to tiny peices - or put it through a food processor. So I took my tiny food processor out and started breaking down the big cake in to chunks and processing the crap out of it. After it was all said & done it was crumbs with tiny flecks of color. So much for the confetti cake idea for Easter. Oh well...I push on...


cake crumbs + frosting = mooshy mess
 Here comes the fun part for all you folks who like to get your hands dirty - literally. You take your cake crumbles and add in 1/2 the container of frosting and mix it together. The recipe said to mix with your hands. Um. Really? Ick. So at first, I decided to use gloves. HA HA - found a solution where I don't actually have to get my hands dirty (I'm a freak, don't like getting my hands really dirty). So I put on some trusty gloves and went to it. Now for those few readers who don't know...I'm a pretty small/short person. 5'1" to be exact. My hands aren't exactly big...not even normal size. They're small. Carni hands as my husband puts it (no offense to those working in the carnival profession out there). So the gloves we have are too big. The fingers go about 3/4 of an inch past where my actual fingers end. So as I'm massaging this gooey mess together, my gloves are getting heavier and heavier because it's sticking to the finger tips of the gloves. Eventually one of my gloves literally slips off from the weight. UGHHHH. So I take the both off, wash my hands and sink them in to the mixture to finish off mixing and then creating the little balls. My mixture - before ball creation - didn't look as pretty and smooth as the cake pop recipe author's did. Maybe it was that she used chocolate and I used this weird confetti stuff...who knows...


The balls - pre-chill
I got about 30-something balls out of that mixture...about what I had originally hoped for. I chilled them over night in our garage fridge since it had the room. The next day after work I whipped out the chocolate and peanut butter chips to melt to dip these guys in. I started off with the chocolate. I didn't exactly follow the directions on the back of the bag to melt them. I tweaked it a little hoping to speed up the process. Um. Yeah. You know those commercials for that mousse stuff that they put in the little pudding cups? Well...my bowl ended up looking like a chocolate version of that - but as hard as cement. CRAP! So I moved on to the peanut butter chips...I totally followed the instructions on those...took my time and the chips melted perfect.

I started with my first pop - dipped the stick in first, then stuck the ball on the stick, then dipped the ball in the melted peanut butter. I sprinked some chocolate sprinkles on top. Opps. forgot something at Joanne Fabrics. I forgot the styrofoam to stick the pops in so they can dry standing up. Umm...fast thinking here. stick your hand in the freezer for a few minutes. Nothing. Blow on it. Nothing. Finally it hardened and I could put it down. SERIOUSLY? I have to do this for all 30-something pops? I thought I'd be there all night. I only ended up doing about 12 based on the melted peanut butter I had.


the cake pops!
 Bradley tried one...and L.O.V.E.D. IT! After all that was said and done...mission accomplished. I made my son happy. Definitely need to work on this recipe a few more times to refine my "technique." If you're looking for some true cake pop inspiration check out www.Bakerella.com. She actually has a book on cake pops...they are adorable perfection!

Friday, April 8, 2011

What Good-Bad Luck: Coffee

One of my favorite books when I was a child was a book called...What Good Luck, What Bad Luck by Remy Charlip. I was reminded of the book after the circus that happened this morning when all I tried to do was make some coffee. So in the spirit of the book...I'll tell my story:

What Bad Luck! I'm super tired and can't snap out of it.
What Good Luck! I got a new coffee grinder to replace my broken one...so I can make a fresh pot of coffee.
What Bad Luck! I forgot to put the lid on the cup that holds the ground coffee...and now am being sand blasted (along with my floor and counter) with fresh coffee grounds.
What Good Luck! I found the lid, cleaned up and made a fresh pot of coffee.
What Bad Luck! I didn't put enough water in the coffee maker - resulting in coffee that's as strong as black tar.
What Good Luck! Solution found: I'll just add a little more almond milk than normal to my cup.
What Bad Luck! I only have a tiny bit of milk left - less than 1/8 of a cup. STRONG STRONG COFFEE!

Coffee Fail!

I should have visited my friends at Starbucks!

Saturday, April 2, 2011

What's Cooking: Corn & Tortilla Soup

My friend Jaymie posted this recipe on her site a few years ago and it looked really good. In her post she discribed the hard time she had finding poblano chilis (despite living in an area where it wouldn't normally be an issue). She settled on canned poblanos and it turned out good. When I tried this recipe for the first time, I couldn't even find canned poblanos!!! I was livid! I used green chili instead which turned out pretty good. I had a bit of an issue cooking the tortilla strips as well. All the strips on the outside of the pan burnt while all the strips on the inside weren't cooked enough. Maybe my oven is hotter than I think...?

Wadas Family Review: The soup turned out pretty good - not as spicy as I thought it might be (probably because of the poblano issue). Rob liked it and I really enjoyed it too. It's definitely a recipe we'll keep around to make in the future. (hopefully we can find the right ingredients next time!)

INGREDIENTS:
  • 3 poblano chilis (or canned polanos if you cannot find fresh)
  • 6 corn tortillas, halved then cut crosswise into 1/2 inch thick strips
  • 3 tablespoons of vegetable oil
  • 1 teaspoon ground cumin (i used a little extra to mix in the soup as well)
  • 6 ears of fresh corn (or approx 20 oz of frozen corn kernels)
  • 1 red onion, chopped
  • 3 cloves garlic, chopped (i used 4)
  • 1 32-ounce container (4 cups) vegetable broth
  • 1 14/5-ounce can of fire-roasted diced or crushed tomatoes (i used diced)
  • 1 avocado, chopped
  • 1 lime, halved
  • 2 tablespoons of cilantro leaves
  • 1/4 cup sour cream
  • salt & pepper to taste

PREPARATION
Preheat the broiler. Broil the poblanos until blackened, 10 minutes. Transfer to a bowl, cover and let cool. Peel, seed and chop the poblanos. (you can skip this step if you buy canned vs. fresh)
Preheat the oven to 400 degrees. On a baking sheet, toss the tortilla strps with 1 tablespoon of oil and the cumin. Bake until golden, about 10 minutes, season with salt.
Meanwhile, in a large, deep skillet, heat the remaining 2 tablespoons of oil over a medium-high heat. Add the corn and cook until charred at the edges, about 10-12 minutes. Add the red onion and garlic, season with salt and pepper and cook until the onion is softened, about 5 minutes. Stir in the broth, tomatoes and poblanos. (I let it simmer for a bit after adding the broth, etc)
Divide the tortilla strips among 4 soup bowls. Add the avocado and a squeeze of lime juice. Ladle soup over the avocado. Top with cilantro; serve with sour cream.

[Recipe originated from Rachel Ray Magazine. Posted by Jaymie. ]

What's Cooking: Easy Chicken & Cheese Enchiladas

This is a recipe I posted about a year and a half ago on our old family blog.  Below is a recipe I found in a magazine while at Brad's old dentist. I took a picture of the recipe from my phone to try it out. I will list the recipe as it was in the magazine, but will add my modifications in red font.

Serves 6; Prep 10 minutes; Cook: 40 minutes
Cost per recipe: $8.54; Cost per serving $1.42

INGREDIENTS:
  • 1 can (10 3/4 oz) Campbells Condesed Cream of Chicken Soup (I did not use this, instead I used 1 can of red enchilada sauce)
  • 1/2 cup sour cream (I used low fat sour cream)
  • 1 cup Pace Picante sauce
  • 2 teaspoons chili powder
  • 2 cups chopped cooked chicken (We buy packages of pre-cooked sliced chicken at Costco - all I do is chop this chicken up and throw in to the bowl. Makes it very easy. This would be good with chicken leftovers too)
  • 1/2 cup shredded Monterey Jack Cheese (We get the mondo pack of shredded Mexican mixed cheese which has Monterey Jack in it. Again, makes this recipe very easy.)
  • 6 flour tortillas (6 inch, warmed) (I ended up using the whole package of 10)
  • 1 small tomato, chopped (about 1/2 cup)
  • 1 green onion, sliced (about 2 tablespoons)
  • 2 small cans of green sliced chilis
  • 1-2 cans (depends on your taste) of black beans)

DIRECTIONS
  • Stir the soup, sour cream, picante sauce and chili powder in a medium bowl. (I added the chilis, enchilada sauce that replaced the soup, and black beans at this point)
  • Stir 1 cup picante sauce mixture, chicken and cheese in a large bowl.
  • Divide the chicken mixture among the tortillas. Roll up the tortillas and place them seamside up in 11x8 inch shallow baking dish. Pour the remaining picante sauce mixture over the filled tortillas. (Add a little extra cheese if you like.) Cover the baking dish
  • Bake at 350 degrees F for 40 minutes or until the enchiladas are hot and bubbling.

The first time I made this everyone loved it (except B). Since then B's warmed up to sauce on his chicken and will eat this up.  I forgot to take a picture and before I knew it they were all gone!

Wednesday, February 9, 2011

What's Cooking: Mediterranean Pizza

I'm all about veggie recipes right now. Especially easy to make recipes! This receipe also came in the January 2011 edition of Fitness Magazine. I just ran out of hummus so I haven't tried this yet - but will update with my opinion on this recipe once I try it out. Here you go!

Ingredients:
  • Pita
  • Hummus (try different flavors)
  • cucumbers
  • avocado
  • cherry tomatoes
  • feta cheese

Directions:
  1. Cut cherry tomatoes in half, cut up avocado in bite size peices, peal and cut cucumbers in small chunks.
  2. Mix tomatoes, cucumbers, avocado and feta in a bowl.
  3. Top pita with hummus.
  4. Top hummus with veggie and feta mixture
  5. Enjoy!

(Photo Credit: Copy from Fitness Magazine)

Wednesday, February 2, 2011

What's Cooking: Veggie Burger Rice and Beans

I have yet to make this...but I have been searching for a recipe that uses veggie burger  in stead of regular hamburger meat. And I didn't want a veggie burger in a bun type of idea.

In January 2011 edition of Fitness Magazine, there is a Veggie Burger Rice and Beans recipe that looks so yummy. The below recipe yields 1 serving and is about 400 calories).

Ingredients:
  • 1 Veggie Burger
  • 1 Tablespoon Minced onion
  • 1/2 Teaspoon Cumin
  • 1/4 Teaspoon Chili Powder
  • 1/4 Teaspoon Salt
  • 1/4 Cup Canned Black Beans
  • 1/4 Cup Thawed Frozen Corn
  • 1 Tablespoon Diced Avocado
  • 3 Tablesoons salsa
Directions:
  1. Cook 1 veggie burger according to package directions. Cut in to bite-size pieces and set aside
  2. Add 1 tablespoon minced onion, 1/2 teaspoon cumin, 1/4 teaspoon chili powder and 1/4 teaspoon salt to low-sodium chicken (or vegetable) stock and use it in place of water to cook 1/4 cup brown rice according to package directions.
  3. Mix cooked rice with 1/4 cup canned black beans, rinsed and drained, and 1/4 cup thawed frozen corn.
  4. Top with chopped veggie burger, 1 tablespoon diced avocado and 3 tablespoons salsa.

(Photo Credit: Copy of Fitness Magazine photo)

Tuesday, December 28, 2010

Another B.F.D.!

This Christmas Eve we hosted the December BFD (Big Family Dinner) to celebrate the holidays and December birthdays. This year there were 23 guests! It was an Italian-ish food theme and everyone brought such yummy items!

Bradley & Rob preparing the marinated veggie kabobs


The spread of food brought by everyone


Bradley got some wonderfully thoughtful gifts from everyone in the family...
More Photos Here.

Monday, December 20, 2010

What's Cooking: Creamy Verde Chicken Enchiladas

Let me start off my stating I made this dish for the hubby. He's a big verde sauce kinda guy when it comes to Mexican Food. I like my sauce red. So I saw this recipe and figured I'd try it out.

My opinion:
  • Positives: Makes a large batch - so you'll have lots of leftovers! My hubby likes it. Even my son thought it was palatable.
  • Negatives: It's really creamy. But this may be a positive for those of you who like a creamy verde sauce.
So take that for what it's worth...If you would like to try it, here's the recipe!

INGREDIENTS
  • 3 lbs boneless, skinless chicken breast (about 6 pieces)
  • 6 cups green enchilada sauce, divided
  • 2 cups water, more or less
  • 1 can (family size, 26 oz can) cream of mushroom soup
  • 3 cans (7 oz can) diced green chilis, divided
  • 3 cups shredded cheese, divided
  • 1/2 teaspoons cayenne pepper
  • 1 1/2 container (8 oz container) sour cream
  • 12 whole flour tortillas (large)  --  I actually got way more out of this recipe than 12 enchiladas...so I encourage you to have some extra tortillas available.
INSTRUCTIONS
  1. Place chicken breasts in crockpot and add 2 cups of the green enchilada sauce and as much water as needed to just cover the chicken. Set on high and cook for about 2 hrs, or on low for about 4-5 hours. (If your chicken is frozen, you'll need to cook it in the crockpot for about 8 hrs).
  2. Preheat oven to 350 degrees F.
  3. In a large bowl, add 1 cup green sauce, cream of mushroom soup, 1 can of green chilis, 1 cup shredded cheese, cayenne pepper and sour cream.
  4. Mix thoroughly.
  5. Spoon a small amount of the creamy mix in to the bottom of two (2) 9x13 pans and spread evenly.
  6. Add the chicken to the remaining creamy mix and spoon in to one tortilla at a time. Roll each tortilla and place seam-side down in the pain.
  7. The recipe calls for about 6 enchiladas per pan. You may be able to get more in.
  8. If you get half way through and find you need more filing, just add some more soup, sour cream or green sauce (or a combo of these).
  9. When the pans are filled, spread remaining 2 cups of green sauce (1 cup per pan) on top of the enchiladas. Take 1 can of the diced green chilis per pan and sprinkle on top.
  10. Cover and bake for about 30 minutes. Uncover and add remaining cheese for the last 10 minutes of baking. Remove when cheese is nicely browned and bubbly.

Wednesday, November 24, 2010

What's Cooking: Mashed Taters

This year for Thanksgiving we're heading over to my aunt's house for our Thanksgiving meal. She's hosting over 20 people at her house. Luckily it's potluck style so everyone brings a dish or two. Two of the items I am bringing are good 'ol mashed potatoes and something my mom and step dad make mashed sweet potatoes. I have a theme going :) I'm trying something a little bit different for the regular mashed potatoes. I'm making garlic mashed potatoes - but will not be using as much garlic as the recipe calls for. The sweet potato recipe is quite yummy. I was hesitant to try it in previous years but as soon as I did try it - I loved it! So here are the two recipes...Enjoy!


Mashed Sweet Potatoes
4-6 Servings

Ingredients:

  • 4 Tbsp unsalted butter cut in to 4 pieces
  • 2 Tbsp heavy cream
  • 1/2 tsp Salt
  • 1 tsp Sugar
  • Pinch of ground pepper
  • 2 lbs sweet potatoes (orange ones), peeled, quartered lengthwise, then cut crosswise 1/4 inch thick
Instructions:
  1. Combine butter, cream, salt, sugar and sweet potatoes in 3-4 quart sauce pan. Cook, covered, over low heat, stirring occasionally until potatoes fall apart when poked with a fork. The cream and butter will provide enough liquid to cook the sweet potatoes. You don't need to add any extra liquid.
  2. Off heat, mash sweet potatoes in sauce pan with potato masher. Stir in pepper, serve immediately.


Garlic Mashed Potatoes
6 Servings 

Ingredients:
  • 5 large potatoes, peeled, and cut in to 1/2-inch cubes
  • 15 garlic cloves, peeled and halved
  • 2 tsp salt, divided
  • 1/2 cup butter, softened
  • 1/2 cup whipping cream
Instructions:
  1. Place potatoes, garlic and 1 tsp salt in a large sauce pan; add enough water to cover. Bring to boil; reduce heat. Cover and simmer until potatoes are tender, about 10 minutes. Drain
  2. Transfer potatoes and garlic to a bowl; mash. Add butter, cream and remaining salt; beat until smooth. 
Update: For Thanksgiving I used approx 10 average sized potatoes with 10 cloves of garlic. It turned out perfect. Not too garlicky...but gave the potatoes a nice kick. :)